
This is a quick overview of our Hierarchical Building alpha preview! I’ll cover how to find it, how to use it, and what’s not working yet.
If you’d like to walk through it step by step, here is a survey-style tutorial for the basics! (You don’t have to submit, but we’d love your feedback if you’re so inclined!)
What is hierarchical building?
A hierarchical object is an object made up of other objects, just like things in the real world. If you took apart an oscillating desk fan you’d have a collection of other objects - blades, buttons, and motors. Attaching them to each other in the right order is what lets the blades of the fan spin while its head oscillates, but at the end it’s still a single object that you can interact with without thinking about its many parts.
An object here is defined as any amount of stuff in a container. Think of these containers like our old shape containers, except they can hold more than just shapes - chips, props, components, and even other containers. This is the basis of a hierarchy: containers with other containers inside them.
How do I get started?
Create a new Maker Room. In the room settings, enable the Creative Beta. Once the automatic save is completed, you’ll have a new toggle for the Hierarchical Building Alpha Preview. Enable that, it’ll save again, and then you’re there.
NOTE: It is STRONGLY recommended that you don’t flip this switch on a room that you care about without making a backup copy first. Not everything works in a hierarchical room yet, and while you should be able to roll back using room restore, this is a one way conversion, and it’s better to be safe than sorry.
How to make a hierarchy
If you create a new shape at room scope, we’ll add a container above it for you. You’ll be moved inside the scope of your new container so you can just continue drawing - like shape containers today.
Only containers can have children!
Otherwise, there are two primary ways to make an object:
The Quick Action Menu available on the Select tool has a “Create Object” option (renamed from Merge.) Create Object will place your selection into a new container.
The Connect Tool - connecting one object to another will attempt to make the first object a child of the second. The order matters!
If the parent object is a container, the first object will become a child of the container.
If the parent is a shape, it will be put into a new container, and then the first object will become a child of that container.
“Scope” is the word we use to define where you’re at in a hierarchy. Your edit scope determines what you can edit, and in some cases, what you can see. “Room scope” is the outermost scope. If you’re inside a container, you’re in that container’s scope, and anything that isn’t “in scope” for editing will be faded out or hidden.
You can use these tools at any scope. Using “Create Object” on a selection of children will create another container, and those shapes will end up one scope lower than they were before.
Navigating a hierarchy

The “Edit” button is how you navigate up and down a hierarchy. If you’re inside a container you’ll see both “Edit” and “Edit Out” at the top of your maker pen menu. Edit Out will take you up a scope, and the Edit tool will take you into the scope of whatever your highlighted target is.
You can name your containers in the config menu, and you’ll see a preview of their name whenever you edit into them.
You’ll also find these options in the Quick Action Menu when you’re using the Select tool. Edit Out will always be available if you’re inside an object, while Edit In will only be available if your selection is a container.
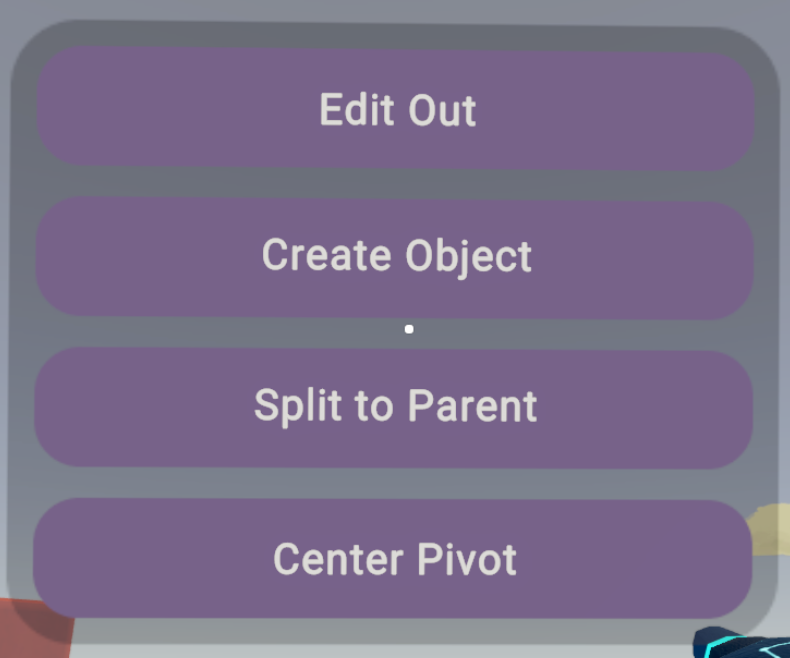
The Quick Action Menu also contains other useful options:
Split to Parent moves the selected object up one scope
Split to Room moves a selected object up to the room scope
Create Object is always present to let you add another layer to the hierarchy
Center Pivot will center the object point on your current selection.
New Looks
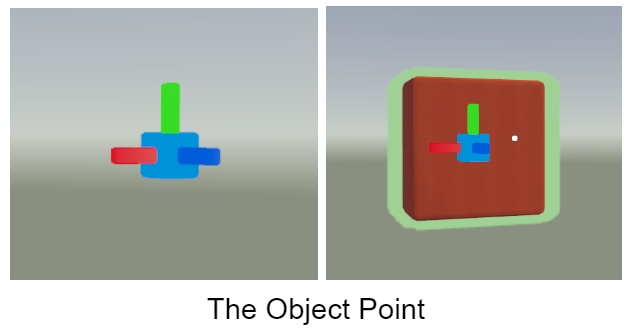
When you start pointing at objects, you’ll notice some new highlight colors. If you point at a shape, chip or prop within your current scope, it will highlight in green as it always has. But if what you’re hovering over is a complex object - a container with stuff in it - it’ll be blue instead, and you’ll see a small holographic box that represents its pivot point.

When you edit into an object, that holographic pivot point preview turns into a small UI widget, similar to our transform handles, that shows local axis colors and can be selected, moved, and rotated. We call this the “object point.” By moving the object point, you’re also moving the pivot point of the object, and when you edit back out again, you’ll see that the holographic pivot preview has moved to reflect any changes you made.
Gizmos
There are a few things that have changed conceptually, but the visuals haven’t caught up yet! The one I want to mention here is gizmos.
In a hierarchy, gizmos are containers that can move their children. Therefore, connecting something to a gizmo is done the same way as with any other container.
What this means is that it no longer matters whether you target the gizmo’s body or the metal axis. All that matters is the order in which you’re doing it. Connecting an object to a rotator will make that object the child of the rotator. Connecting a rotator to an object will make the rotator a child of the object instead.
Hierarchical Circuits
The circuit layer exists in every scope. As you navigate up and down an object’s hierarchy, you’re simultaneously navigating that object’s circuit hierarchy, too. Any container with chips has an object board that displays the same name as the container. Editing the visible object or its board will take you into the object’s scope.
The object point acts as the anchor for the object board and the scope origin for stuff like “Set Position,” too!
As you navigate a hierarchy, chips appear or not based on whether or not they’re in your current scope. While objects above your scope are grayed out, all chips outside of your scope are hidden completely (though there’s a setting to change this if you’d like to.)
Tip: Detach your object boards for the best editing experience. We’ll probably make this automatic but we haven’t yet. :]
Tip: Moving things to a new scope in your hierarchy can break existing circuit wires. We recommend that you get your hierarchy as you want it before you do a bunch of wiring!
Known Issues
Props will not function as parents! Not all props - especially interactive props - will function in a hierarchy as children.
What for sure DOES work as child objects: Buttons, toggle buttons, and most components without a player input mechanism (e.g. lights, audio players)
What for sure DOESN’T work: Invisible collision, Gun and Trigger handles, all CV1 objects, most interactive props.
Avoid for now: Costume dummies, seats
Edit tool does not work on Object Boards. Target Containers and Gizmos directly to edit into them. You can't currently access a prop's board at all.
Not yet implemented:
Collision, grabbability, and physics settings
Tube control point editing
Undo/Redo
Clone
Copy/Paste
If you get stuck
If you try to delete something that doesn’t work, you’ve probably run across something that isn’t supported yet. The best thing to do is leave without saving (and we’re sorry about any lost work - we’re chasing these down one by one!)
Rolling back to an old save should work, even if that old save is before you flipped the Hierarchical Building switch.
Got feedback?
We’d love to hear it! Please join us in Discord or leave us a note on our new Hierarchical Building Zendesk. Keep an eye out for a survey from Coach - in a few weeks, we’ll send one to everyone who’s participated.


