

Creators are making incredibly impressive rooms these days. Many of these rooms involve managing lots of data and intricate circuitry, performing remarkably complex tasks. Recently, we talked about how Data Tables can help on the data side.
Now we’re introducing The State Machine to help on the circuits side - it manages all that awesome complex circuitry easily by breaking things down into simpler states.
Fast Facts
Simplified Complex Functionality: State Machine chips simplify the management of intricate circuitry in Rooms by breaking it down into simpler states.
One State at a Time: These chips ensure that only one child state is active at a time, reducing the risk of conflicts between different behaviors and eliminating the need for complicated condition checks across different states.
Modular Design: Easily add, modify, or remove states within the State Machine, just like you would with a circuit board.
Nested State Machines: State Machines can also be nested within State chips, allowing for more intricate control over sub-states.
Synced or Unsynced: State Machines can be configured as synced or unsynced. Synced states provide consistency across players in multi-player environments.
THE STATE MACHINE CHIPS
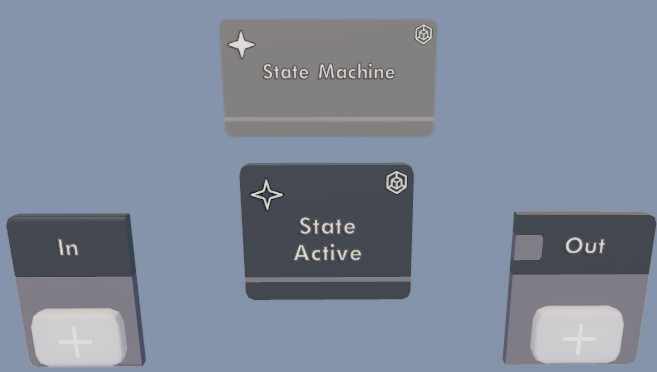
You can now add a CV2 State Machine chip to your rooms from the palette to get started. Think of the State Machine chip as a circuit board with a superpower: only one child state is active at a time. That means the events inside a State Machine execute when a state chip is active (and do not execute when that chip is inactive).
What would a State Machine be without its states? Enter the State chip. If you’re familiar with circuit boards you know that you can edit into them to add more chips. The same is true for the State Machine chip.
The State chip partners with the State Machine chip. By default, a State Machine chip contains a child State chip. Remember, only one child state is active at any given moment.
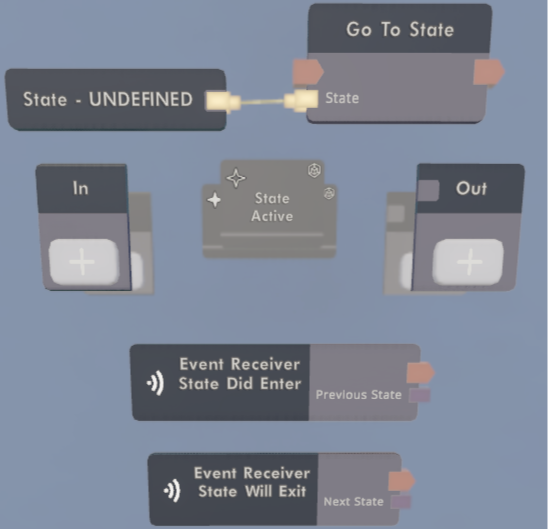
Let’s go deeper into the chip hierarchy by editing into that State chip to see what makes it tick. State chips come with child chips that allow you to go to other states and control what happens when entering or exiting this state.

NPC STATE MACHINE EXAMPLE
Now that you have a rundown of what the State Machine chips are, let’s see them in action!
In games, Non-Playable Characters (or NPCs for short) often use state machines to handle the complex functionality needed to bring these characters to life. Using State chips, we can easily transition to a specific NPC state, regardless of whatever state it happened to be in before.
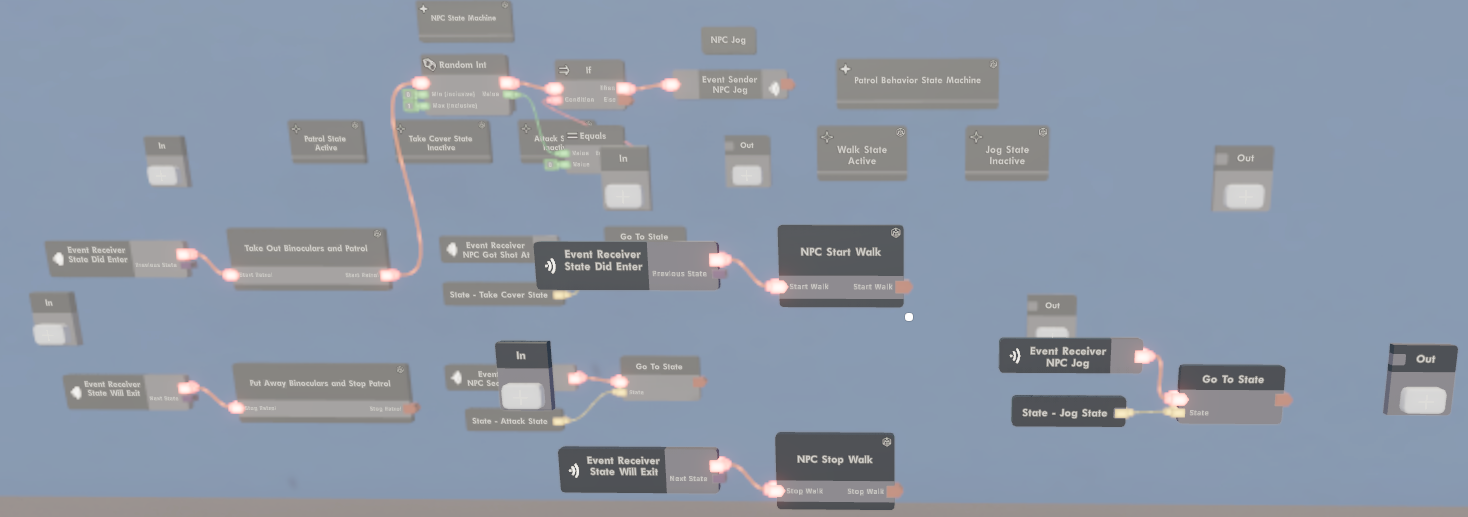
Let’s create a simple NPC state machine example to see how the pieces come together. Say we want an enemy NPC with three behaviors: patrol, take cover, and attack.
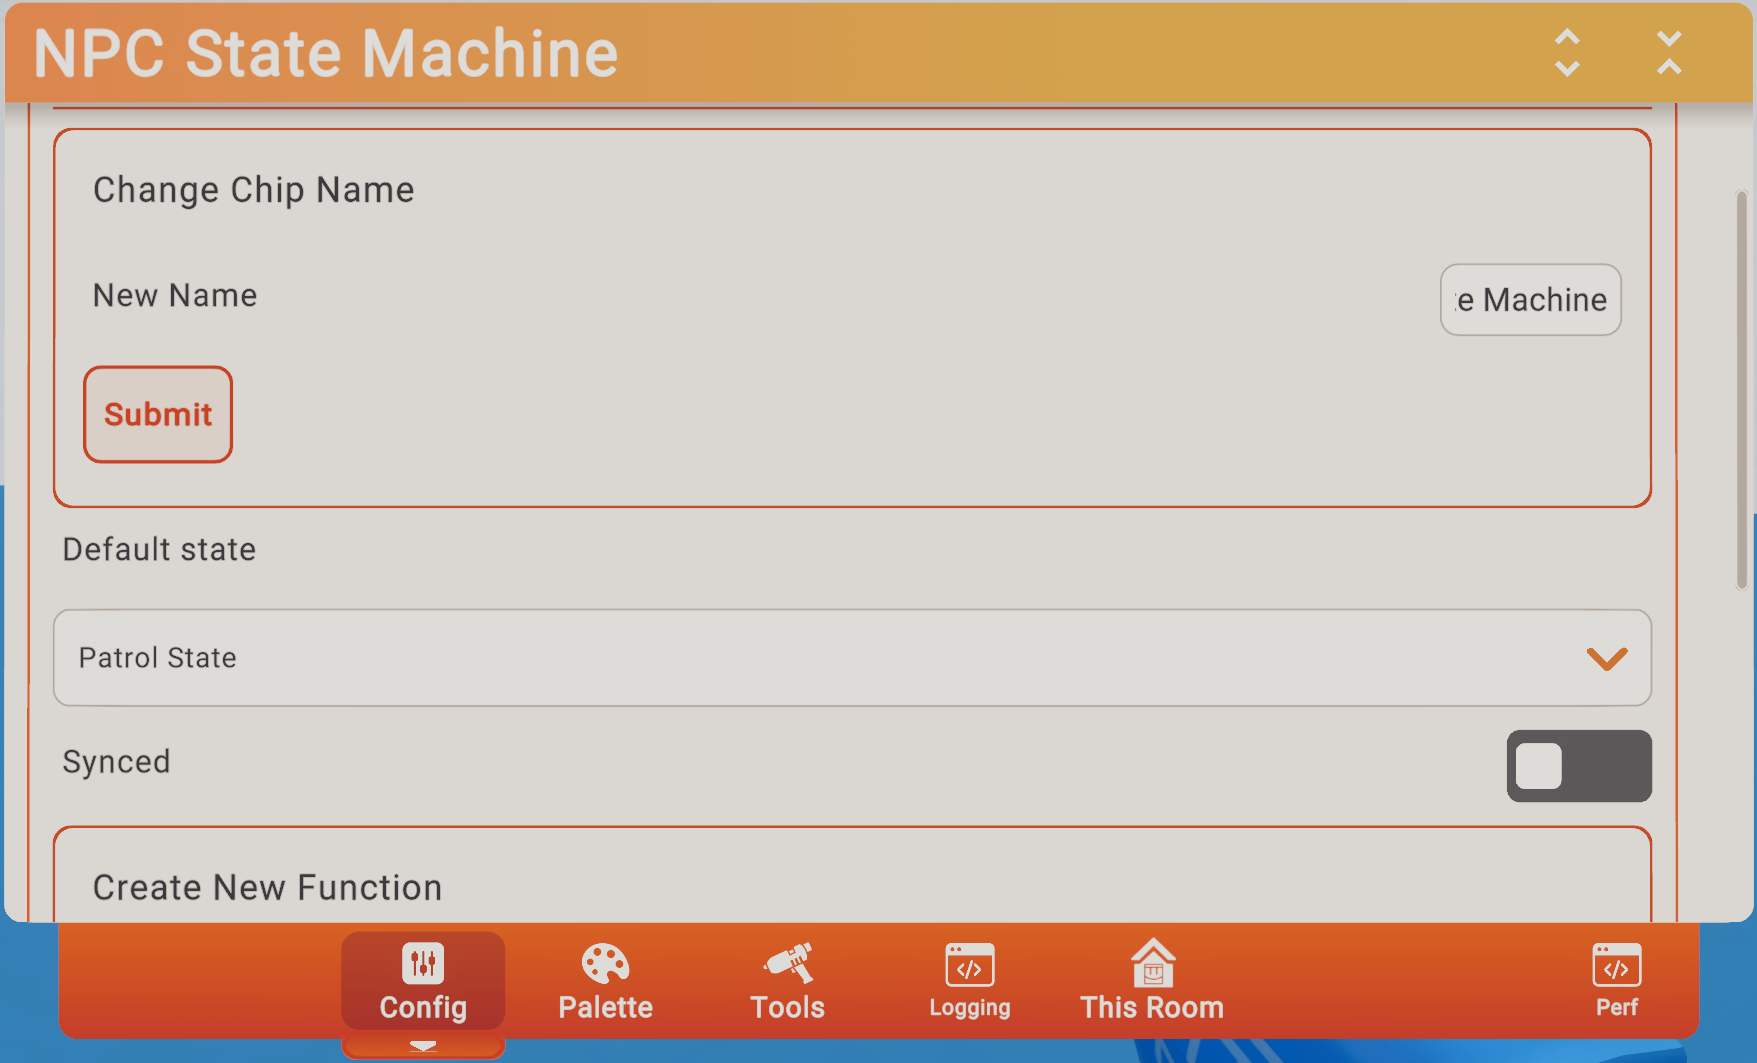
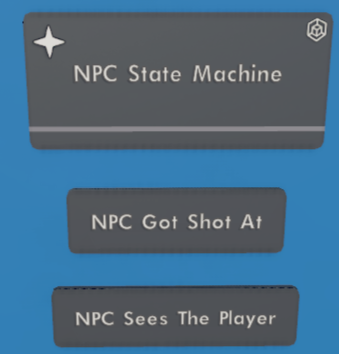
Drop a State Machine chip into the room from the palette and use the configuration menu to name it “NPC State Machine”.
Open up the palette and add in two event definition chips that control the NPC’s behavior: “NPC Got Shot At” and “NPC Sees The Player”.
Edit into the State Machine chip.
Since State Machine chips come with a child State chip by default, let’s rename this default chip to “Patrol State”.
We will also add two more state chips from the palette and rename them “Take Cover State” and “Attack State”.
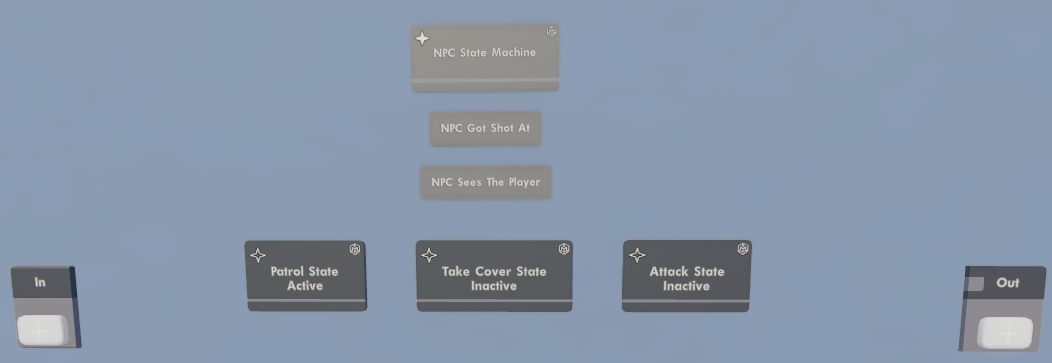
We want the NPC to patrol by default, so the “Patrol State” state needs to be active. Since we renamed the default State chip that came with the State Machine, we’re all set.
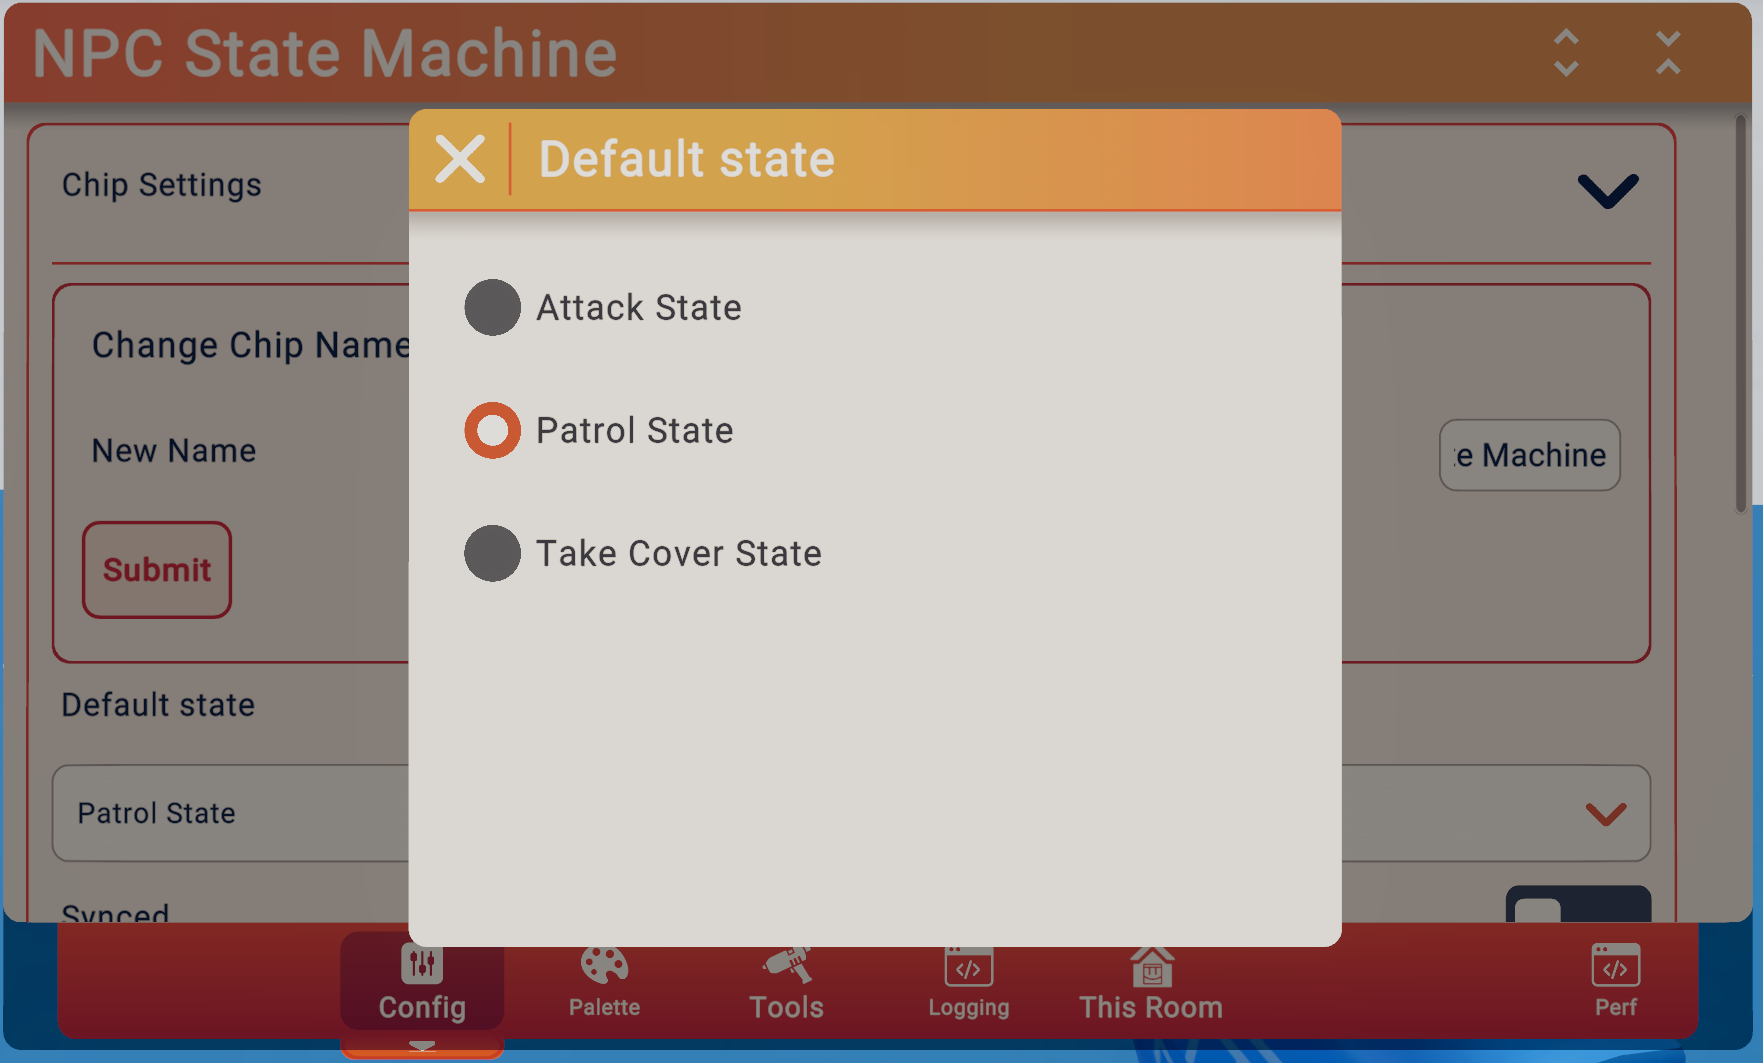
If we ever want to change the default active state, we can do that by configuring the NPC State Machine chip and changing the default state value.
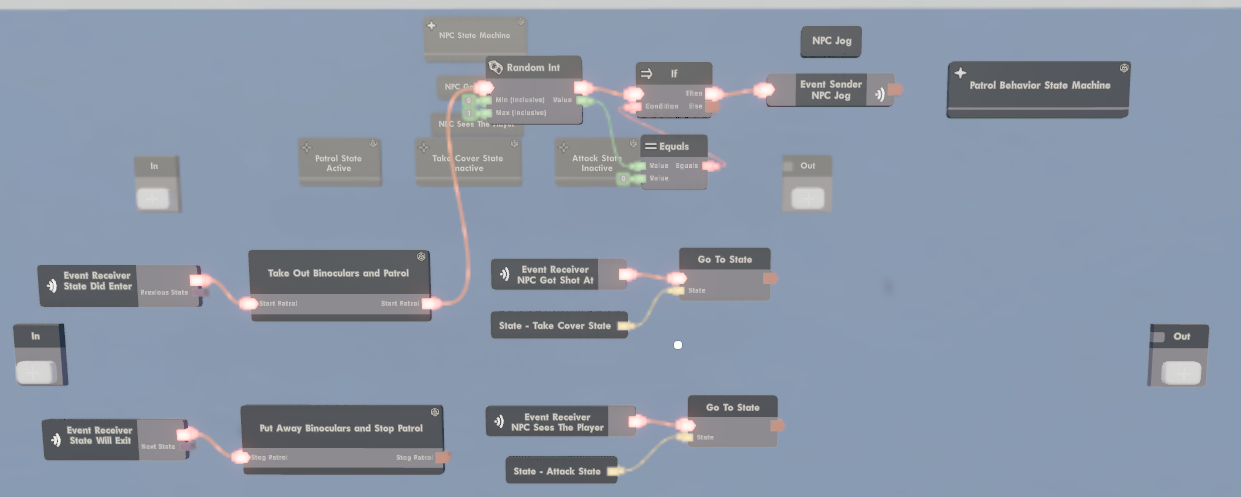
Let’s imagine that our NPC takes out high-tech range-finding binoculars when they start patrolling and puts them away when they stop patrolling. Plus we only want them using binoculars when patrolling. Keep this in mind, we’ll use the binoculars to show how a state machine can help simplify complex functionality later.
Edit into the “Patrol State” chip to set up what happens when the NPC enters and exits this state.
Use the State Did Enter event receiver that’s already in the State chip to execute the circuits needed when “Patrol State" becomes active. In this case, we’ll connect it to a circuit board that tells the NPC to take out its binoculars and start patrolling.
Similarly, use the State Will Exit event receiver that’s already in the State chip to put the NPC’s binoculars away and stop patrolling whenever this state becomes inactive.

Now let’s tell the NPC what happens when it gets shot at (take cover) or if it sees a player (attack). We make these transitions happen with our State Constant and Go To State chips.
Add two event receivers and configure them to use the event definitions we created earlier: “NPC Got Shot At” and “NPC Sees The Player”.
We want to create transitions to two other states: “Take Cover State” and “Attack State”. Our State chip comes with one State Constant so we only need to add one more. Configure one of them to “Take Cover State” and the other to “Attack State”.
Connect one of the State Constants to the Go To State chip that’s already here in our State chip. Add one more Go To State chip from the palette and connect it to the other State Constant.
Finally connect our “NPC Got Shot At” and “NPC Sees The Player” event receivers to the Go To State chips. Now when the NPC gets shot at, it will go to the take cover state. When the NPC sees the player it will transition to the attack state.

There you have it! We’ve created an NPC that has three separate states that will never conflict with each other because only one child state is active at a time!
Thanks to this, we don’t need to worry about whether another NPC Got Shot At event receiver inside a different State chip does something that conflicts with our patrol behavior. Event receivers inside inactive State chips don’t execute. No need for complicated condition checks across all of our different states!
Going back to those awesome high tech range-finding binoculars from our example: Our NPC only uses them when they patrol. We made sure that the NPC puts them away when they leave the “Patrol State” by using the State Will Exit event receiver. No matter what state the NPC goes to next, those fancy binoculars are tucked safely away.
STATE MACHINES INSIDE STATE CHIPS
You can also nest state machines within state chips! Imagine we want states inside our Patrol State chip that decide if the NPC is walking or jogging when they are patrolling. Thanks to the state machine’s superpower, we can!
When the Patrol State chip is active, its child chips are active too, including child State Machine chips and their children. It works all the way down the chip hierarchy.
Let’s get into how to do this.
Add a new State Machine chip inside the Patrol State chip and name it “Patrol Behavior State Machine”.
Add an event called “NPC Jog” that we can use inside our new State Machine chip.
Add a mechanism by which an NPC switches between jog and walk. Use a Random Int chip, an If chip, and an Equals chip to send the NPC Jog event randomly to the State chips inside our new State Machine chip. This will randomly tell the NPC to walk or jog!
Edit into our Patrol Behavior State Machine chip and rename the default State chip that’s already there to “Walk State”. This state is active by default, so our NPC walks while it patrols.
To make it possible to jog, add a new State chip and name it “Jog State”.
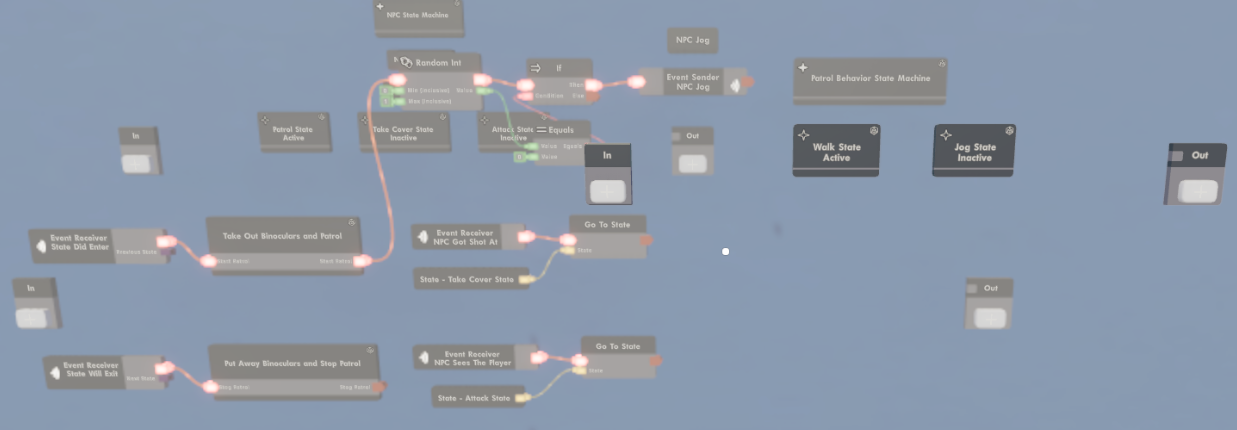
Within the Walk State chip, use the State did Enter and State Will Exit chip to make the NPC start walking when entering this state and stop walking before leaving this state.
Add and configure an event receiver for the “NPC Jog” event. Conjure a State constant and connect it to a Go To State chip to transition from the walk state to the jog state. If the Random Int chip we set up earlier outputs a zero instead of a one, the “NPC Jog” event executes and we transition to the Jog state.
Now when our NPC is in the patrol state they either walk or jog while patrolling. Importantly, our other states still don’t need to worry at all about what happens when the NPC patrols. When the NPC is taking cover we don’t want them walking around! When the NPC is attacking we don’t want them to use their high-tech binoculars!
Since our states use the State Will Exit event to clean up the current state before leaving, we’ve made it easier to manage and create new functionality for our enemy NPC.
SYNCED STATE MACHINES
One last thing before you dive into creating your own state machines to make your functionality simpler to think about, manage, and expand on: state machines can be synced or unsynced. A synced state machine’s active state makes the experience consistent across all players in your room. Just use the configure tool on your State Machine chip and look for the Synced toggle.